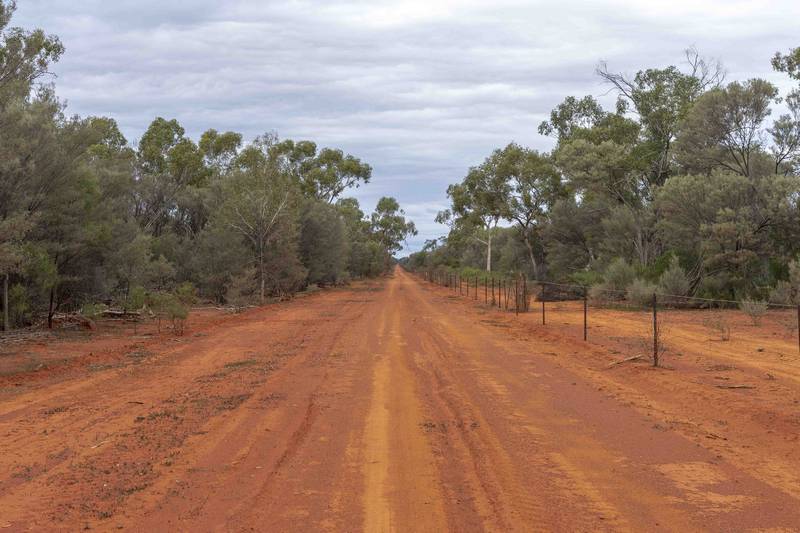
Sections of Gundabooka National Park are flat so I thought it timely, prior to this year’s NSW Championships, to prepare some thoughts about navigation in such country.
The map we’re using is a custom prepared map at 1:25,000 scale with 5m contour intervals. (The base map is 1:100,000, 20m contours.) It is not unusual in sections of the map for this course for there to be a kilometre between contour lines. Bear in mind too, that the ground does not necessarily uniformly slope between contours and it is very difficult to tell whether you are generally ascending or descending. In 100 metres, going over even 0.3m rise and dip makes it difficult to tell whether one is 100mm lower or higher than where one started.
Terrain features are very indistinct in places and are quite difficult to identify. Watercourses are typically marked as thin blue lines on a map, but on the ground may well be swathes more than 100 metres in width. Unless the watercourse is an erosion trench, following one up or downstream can be futile. Even finding quite large point features such as tanks (dams) is often not a matter of taking a quick bearing and walking straight to it.
So, how do you navigate in such terrain?
The first step is to precisely know your starting point and to give yourself a time budget in which to find the control. If (when?) the time budget runs out, then one needs to navigate the team to a highly identifiable feature and then either:
- start again – not forgetting to reset your time budget, or
- quit this one and try another control, hopefully a better identifiable one
In any case, it’s vital that you relocate to a known starting point.
Essential skills are being able to take and travel along accurate bearings, and to keep a good account of the distance you’re travelling along that bearing.
Visibility in mulga scrub is often not good (20-50m). But there are taller trees that are often visible above the scrub and these can be sighted to maintain a pretty good course. At night you can hopefully use stars or moon. The mulga scrub also means walking in a straight line is often impossible, so accounting for the distance one has travelled must consider the inevitable detours.
The most practical method we have in rogaining to measure distance is our steps. It’s important to know your own pace – to count the number of steps you take to travel a certain distance. You ought to know how many steps you take to travel 100m or 1km in open terrain. You’ll have to modify your count to allow for thicker bush and up/downhill interference.
For me, I count double paces – each left foot striking the ground. On open relatively flat ground 100m takes me 65 double paces. In light scrub I allow 70 paces per 100m and in denser scrub 75. There can also be corrections to be made for “map flat” distances when travelling up and down slopes but this is not going to be an issue on this map.
It is important to keep track of step counts or distances. I use two methods – one is to fold down a finger on my left hand for each 100m; 500m intervals I track in my head. The other method I use, when I know I’m going to have to do this a lot, is to carry a length of string with a knot in it every cm or so. For every 100m, move fingers to hold the next knot. Methods that I’ve heard another method is to pick up a stick or leaf for each 100m or 100 steps, or a green twig and make a partial break in it every 100m or 100 steps.
Measuring time can be a useful tool, especially if you have good visibility, but it’s not as accurate as pace counting.
While direction and distance are the primary navigation tools, map reading is also important. Wiggles in adjacent contours can help one determine the size of any undulations present and whether you should be walking up or down. Water always runs down, so keep track of mini erosion arcs (small horseshoe shapes from water erosion) which will always point to the local downhill. Integrating these visually across an area can give a good general indication of the direction of “downhill”. Leaf litter dams are another way of telling down and leaf litter flow-lines can also indicate the edges of very broad, shallow watercourses.
It is crucial to understand what one’s likely cumulative errors are. Over a kilometre I can normally maintain my course within 5° of the set bearing – or about 80m either side of my intended track. For 2km I can be 200m either side of my intended track. For distance, I can normally maintain about 5% accuracy, or ± 50m per km.
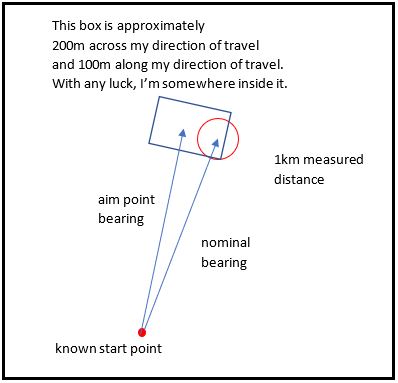
For example, let’s say I’m at a control going for another one that’s 1km away. I know my start point within a few metres. When I set the bearing to the next control, I know it is 1km, so I set the bearing and intend to walk to be approximately 100m either left or right of the control. This is called “aiming off” and the idea is that when I’ve walked my kilometre, I am (almost) certain which side of me is the direction to the control, but it may still be ahead of me or behind me by around 50m.
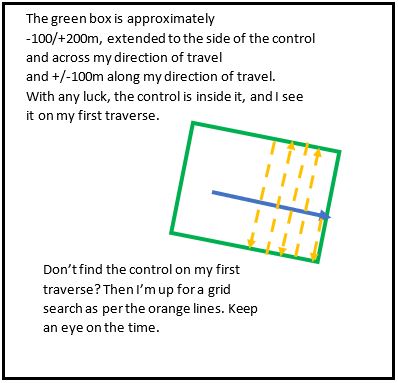
At this stage, I turn the appropriate direction and at exactly 90° to my original bearing, walk that line for 300m (the 200m max I might be out, plus 100m to be damn sure). With any luck I spot the control on this traverse. If not, then I walk 100m back on my original bearing, turn 90° towards my original track and then walk around 20m (depending on visibility). Another 90° turn (so now parallel to my original bearing) and walk 200m on that bearing. Turn, walk the offset, turn again, and again walk parallel to the original bearing, this time back towards the start.
For me, finding a point by this method works well up to about 1.5km and I can manage it up to around 2 to 2.5km. Past that, my errors are too large to stay reasonably oriented in what has become a rather large search area and grid. Your distance may vary.
Remember that every time one changes bearing and walks distances, errors are accumulating. This is mostly why, at the end of the grid search, one needs to re-establish a known accurate position, rather than try to re-search the initial grid area. There are techniques to make these kinds of searches more accurate – for example, placing a recognisable marker at the first location one walks to. Then, one can place additional markers at the start and end of each grid traverse. One can then sight the grid markers at each the conclusion of each grid traverse, and hopefully also come across the initial position marker. The disadvantages are that this is time consuming and then having to clean up one’s markers afterwards.
I recommend going out to a relatively flat area and practise walking a bearing and keeping track of distance travelled to work out your own error margins which will be different to mine. The time spent looking for a control is highly dependent on the size of the initial “uncertain box” and the larger “it really should be in here” box.
Taking a GPS while doing this testing can be handy. Way mark your start point, then walk your bearing and distance using compass and step count. After, say 300-500m, use the GPS to find distance and direction from your current location back to your start point. This will tell you your direction and distance errors. Done a few times, this will give you an indication of your error range. Repeat for a couple of different locations, directions, slopes and scrub thicknesses. Don’t be surprised to find you have a “set” left or right, or uphill or downhill. Write down these numbers!
For Gundabooka, most of the map is relatively high relief – at least three contours per km, which is enough to give one a definite sense of up and down (and with some bigger hills up to 250m to keep the climbers like Mike Hotchkis content.) There are several low-relief controls to provide some skill testing and entertainment value, not a large percentage of the total number of controls but hopefully they’ll encourage you to have a go.
All these techniques obviously become more difficult and more important at night but the skills are applicable every time you need to find a flag in the bush.